Recently we began working on the CICD (continuous integration, continuous deployment) setup for a new greenfield project (sorta) at my company, Rackspace. We based the setup on a few set of requirements:
- Our staging environment should CD the master branch. Pushing to master should cause a build and deploy to our staging environment**.
- Versioning of a build/release should be managed by adding a Release to the GitHub repo. Creating the Release should cause the deploy.
- Production deploys should not rebuild any code, but should leverage the same artifacts as were built for our staging environment.
- We should be able to redeploy to production any previously deployed build without rebuilding the code.
** We’re not using dev/stage/master branching patterns. We decided long ago, on the predecessor codebase, to abandon having so many branches. We all develop our bugs and features off of 'feature/' branches from master and pr straight to master. Since our process allows for quick recovery of issues we felt the added simplicity of our code management and deployment process was worth it.
In our case we’re using AWS as our stage and production deployments, each housed in their own AWS account. Our codebase is a basic web-app with Angular on the frontend and NodeJS on the backend. We’re leverage ECS and Fargate configs with Docker containers for the running API. CloudFront will sit in front of our load balancers to help cache.
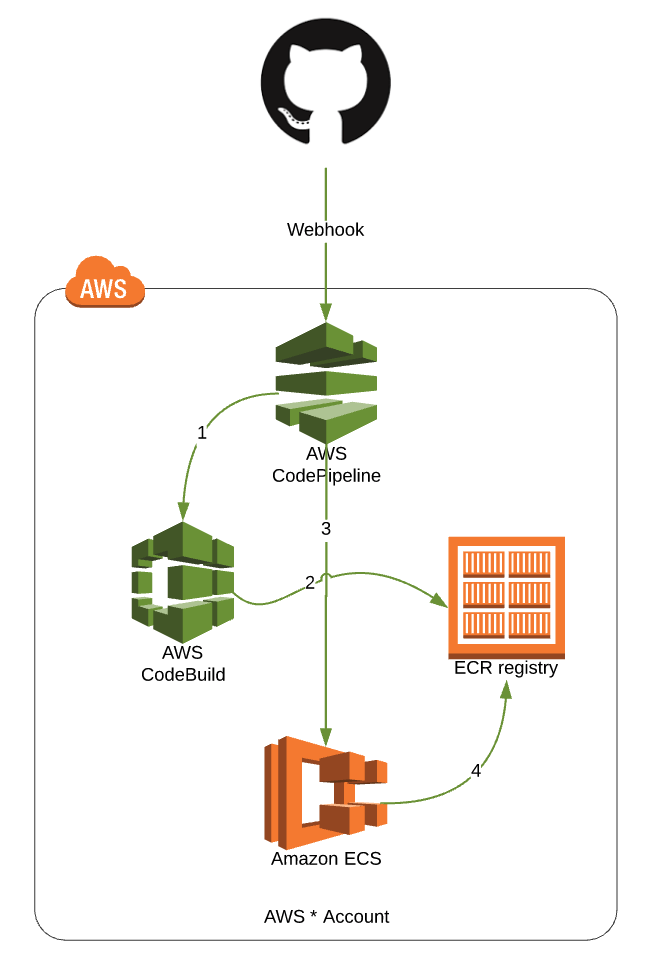
We’ll start with stage and this basic setup:
 Simple, too simple
Let’s review the process:
A GitHub webhook is setup with the AWS CodePipeline to start CodePipeline on pushes to 'master'.
- CodePipeline pulls code and starts our CodeBuild project.
- CodeBuild runs docker build and tags the new container with the commit hash. It then pushes this to our ECR registry
- CodePipeline then tells ECS about our new image and the Task Definition on our ECS Services is updated.
That’s it, ezpz™. We have a CICD to our staging environment. This satisfies our first requirement above.
Now we need to talk about production, because that’s a little more involved.
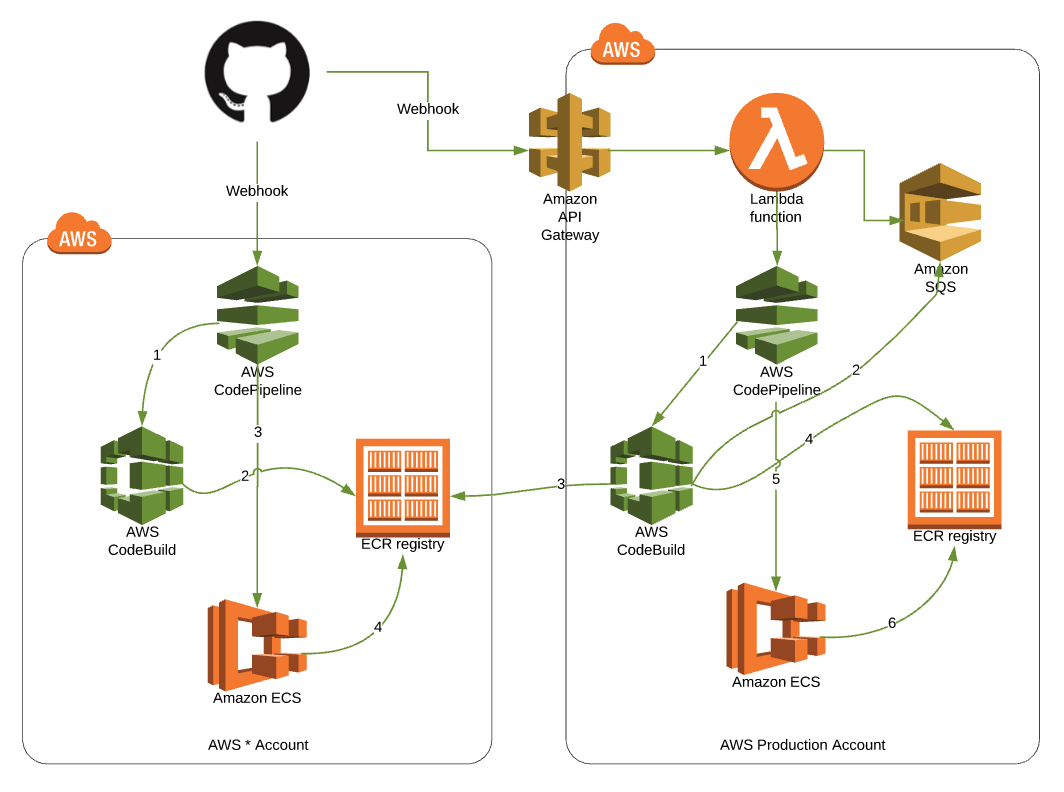
We’ll start again by using a webhook, this time with just Releases from Github. Creating a new GitHub Release will trigger this process. Instead of hitting CodePipeline directly, it’ll hit an API Gateway endpoint. That forwards the webhook message to Lambda. It also places the Release information in the body of the webhook message in an SQS queue for use later. The Lambda then starts CodePipeline.
 There we go...
Our CodePipeline looks very similar this time, the only difference is in the CodeBuild project (#1). That project doesn’t build a new Docker container. Instead, it uses the release information in the SQS queue (#2) to find the related image in the staging (AWS * Account) ECR (#3) and then pushes the new image to ECR (#4). Finally, ECS is updated by CodePipeline (#5) and ECS uses the new container (#6). CodePipeline became the place we changed things a little. Everything else is basically the same.
This satisfies our next two requirements around production deployments. Finally, if we ever need to redeploy a previous build, we’ll have the image in ECR and we can manually update the Task Definition in ECS with the old container. This satisfies our last requirement.
And there we go! We now have a reliable and hands-off method for getting code deployed to both our staging environment and production. One is by push (staging) and one is by Release (production).
There were some interesting discoveries made during this build that might change in the future. First, we had to use APIG/Lambda for the production webhook because the one in CodePipeline won’t respond to Releases (even if you manually change the webhook in GitHub to just ‘Releases’, CodePipeline won’t respond to it and start the Pipeline). Second, there was no way to pass this information from the Lambda to the CodePipeline execution, so SQS was used as a holding ground for that information, as it’s required to properly tag the container in ECR. Both of these issues could be resolved in the future by AWS.
Additionally, the CodeBuild project also writes the release information to dynamodb with the tag name. I didn’t include this in the discussion because these sort of ‘one-off’s felt out-of-scope for what I wanted to cover here. But, note that the CodeBuild process is where we’re likely to do all of our customizations.